How to "Rustore" or "Rust-orize" a gas pump - Mon Aug 26 2013 01:12 PM
I was asked about the process that I used when restoring the Erie 70 twin. (see showcase forum) I tried to make a video, but I need more practice on that. So here is how I did the Erie.
I was able to obtain ˝ of a very rare Erie 70 Twin. I wanted to thank Matt Alvarez for his generosity when he sold me his Erie, so I could have the second pump to complete this project.
Over the years, I’ve come to realize that I prefer the look of the old pump with character, rather than the high gloss of new looking pump.
I’ve restored or “rustored” a few pumps now and have figured out a system that works for me. I’ll share with you how I do this process, and hopefully, some of you will share maybe a better way of accomplishing this.
At the end of this I will post a link to a 4 minute video that I did on this pump. I think the pump turned out much better than the video did. More practice I guess.
To start with, let me tell you that I’ve never done this on a freshly sandblasted pump. I have always used a pump that had the old paint, nicks, chips dings etc. I’m not sure exactly how I’d use this process on a very clean pump. Trial and error I guess.
I usually strip off any stainless or other trim piece that will be highlited when the pump is finished.
On the Erie 70 twin, I started peeling/picking off the paint that was over the original shell decals. This is a major time consuming job, as it’s hard to do especially where there have been decals placed over older decals. On this pump, I ended up using the 3rd decal down.
In the past, I’ve tried paint stripper, but I don’t have the patience or timing to remove just the top layer before it softens up the decal. I have also tried a heat gun, and for me, that process just kind of “gummed” everything up, and stuck the paint/decal/more paint together even tighter. No problem with either of those processes if you want to remove it all.
The single edge razor blade is what I use. Sometimes I can slide the blade in between the decal and the paint on top of it. Sometimes, I just have to pick, pick, pick. Like I said, it’s a time consuming process.
On the Erie 70 twin, a lower portion of the decal with missing on both sides, making it look pretty bad. I tried filling it in using a small paint brush and red paint, which made it look worse. I ended up using the small 3” porcelain “ethyl” signs over the damage on both sides.
I lightly sanded the whole pump, making sure that I did not remove all of the chips, dings or scratches. Basically, I just wanted to smooth up the surface a little for better adhesion of the paint. I wanted to leave the recessed dings, as they will give the pump “character” later in the process.
I used an enamel paint (like Rustoleum) and rolled or brushed a coat of yellow paint over both pumps. I used the brush, to make sure all of the brush marks were going the same direction. Make sure that you paint around your decal, now that it’s exposed. Spray paint would work just as well. I couldn’t find the right shade of yellow in spray, so I brushed it on.
After the yellow dried, I used red enamel paint, and painted a light red vertical stripe on the doors, as well as a red base, and red top portion that would hold the globe.
Then, using a rag soaked in paint thinner, I “ragged” over the red stripe, removing enough of the red paint that in areas, one could see the yellow underneath. This gives the red color the illusion that it’s faded with time.
I left a heavy coat of red paint on the base. On the top portion, I had to let it dry, and by the time I got back to it, the thinner didn’t work well, so I used some light sand paper to expose some yellow paint areas underneath the red.
I was able to expose much of one “leaded” decal on one pump, but on the second pump, I had to apply a new leaded decal.
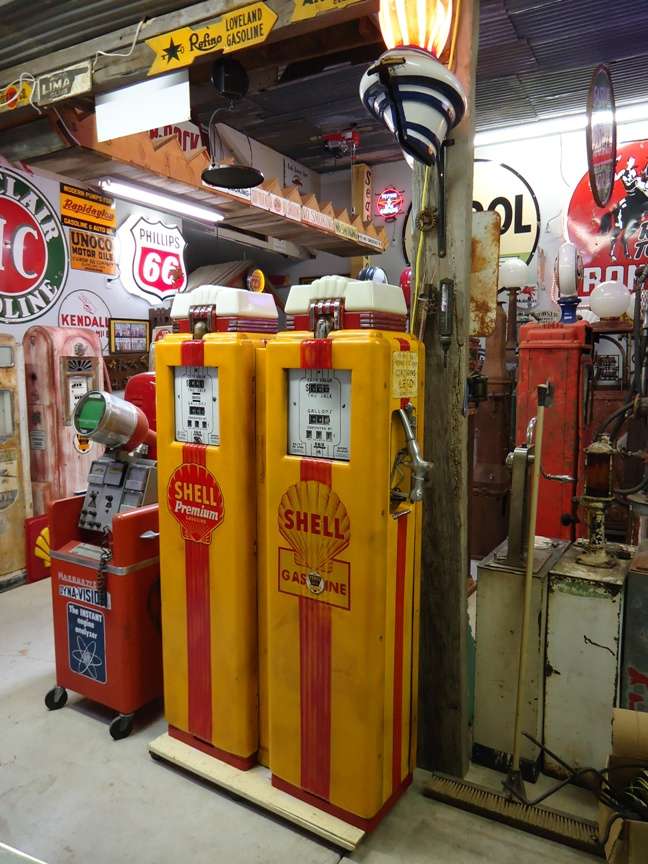
Since one of the pumps I was using had been painted red on one side, and green on the other, and there were not Shell decals to start with, I used two new decals for the doors of the second pump. I chose the red “premium” decal, as I wanted this twin, to look like it dispensed two different grades of gasoline.
I then thinned some brown enamel paint to the consistency of stain. (or you can use a walnut stain) Using a soaked rag, I went over the whole pump including the “leaded” and door decals with this stain. At the same time, I had a clean rag in the other hand, and quickly wiped the stain off, leaving the nicks, and scratches dark, but removing most of the stain from the rest of the surface.
This is not an exact science, as you do this process, you will begin to see the pump age, and you can add more, or remove additional stain to get the look you are going for.
Let this all dry, and polish your stainless, or clean your globes while waiting for it to dry. In my case I needed some new stainless for the strips on top. It seemed everyone was at Iowa gas, so I found an old piece of stainless, cut some new strips, bent them, and attached them with double sided tape.
After the pump is dry, I covered the whole thing with a coat of semi-gloss clear. This will protect the different colors of paint/stain that is on the pump, and also give it a little shine. I do not use a high gloss on this process, as that is not consistent with a pump that was “found in the wild”. On other pumps, I have used a “flat”, or sometimes “matt” clear coat.
After the clear dries, bolt on your stainless, the globes, nozzle etc. and you are done.
I couldn’t find, nor could I afford original milk glass tops for the erie. I had purchased one of the plastic tops made, and so had Matt Alvarez. When I purchased the pump from Matt, it came with his top.
This reminds me, if anyone should have been writing an article on “rustoration”, it should have been Matt. His collection of “found in the wild” pumps is incredible. This isn’t just one guy’s opinion, I’ve heard several other collectors mention his collection.
o Here is a link to the video on the internet. http://www.youtube.com/watch?v=CKKfP7fY3cE&feature=youtu.be
Pump I started with: Uploaded with ImageShack.com
Red green pump: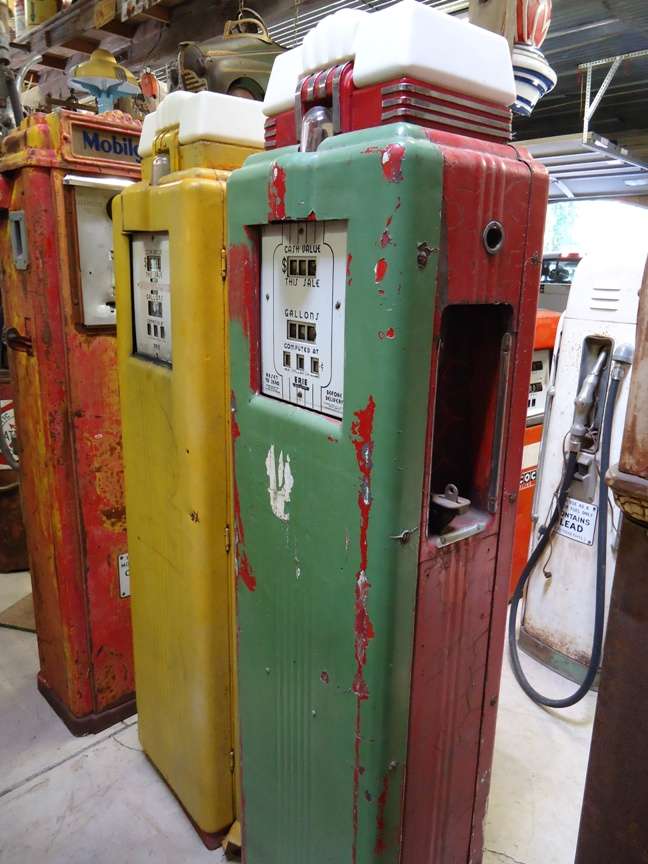 Uploaded with ImageShack.com
Picking decal: Uploaded with ImageShack.com
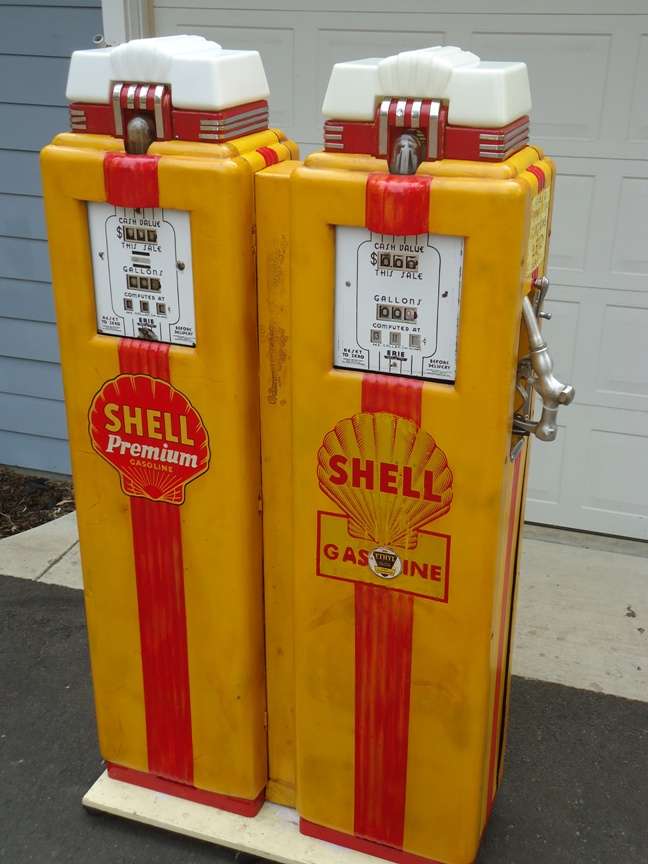
Two doors: Uploaded with ImageShack.com
Top: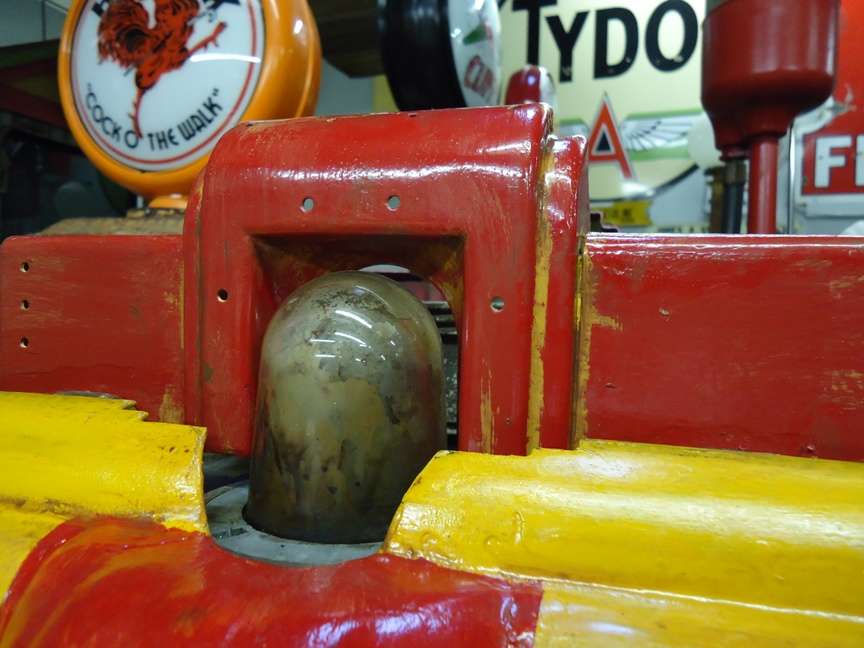 Uploaded with ImageShack.com
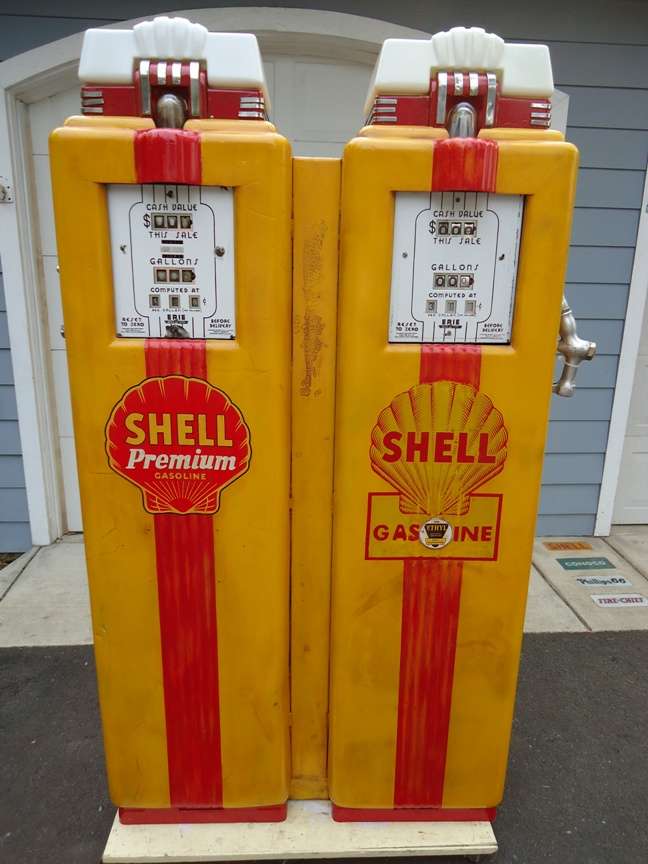
Left: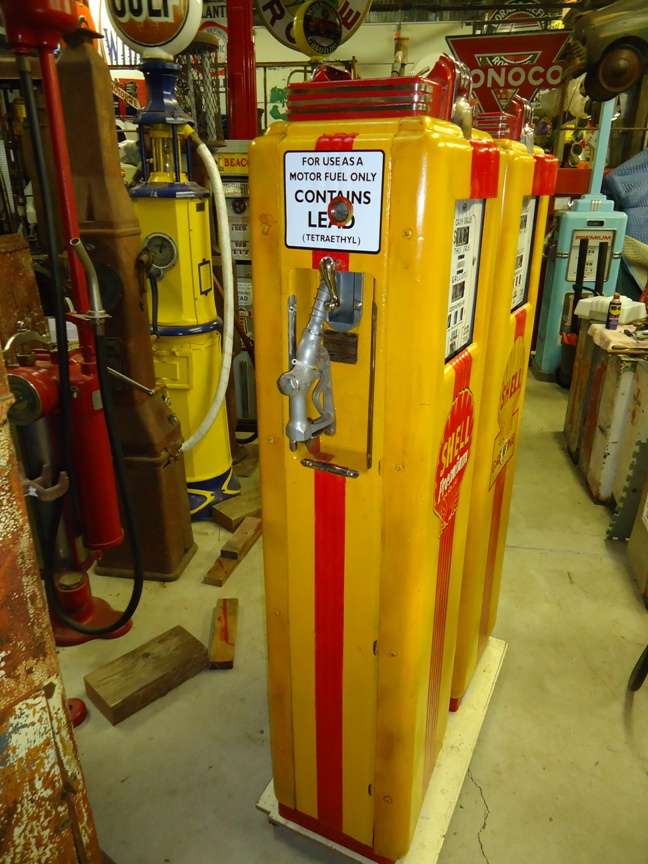 Uploaded with ImageShack.com
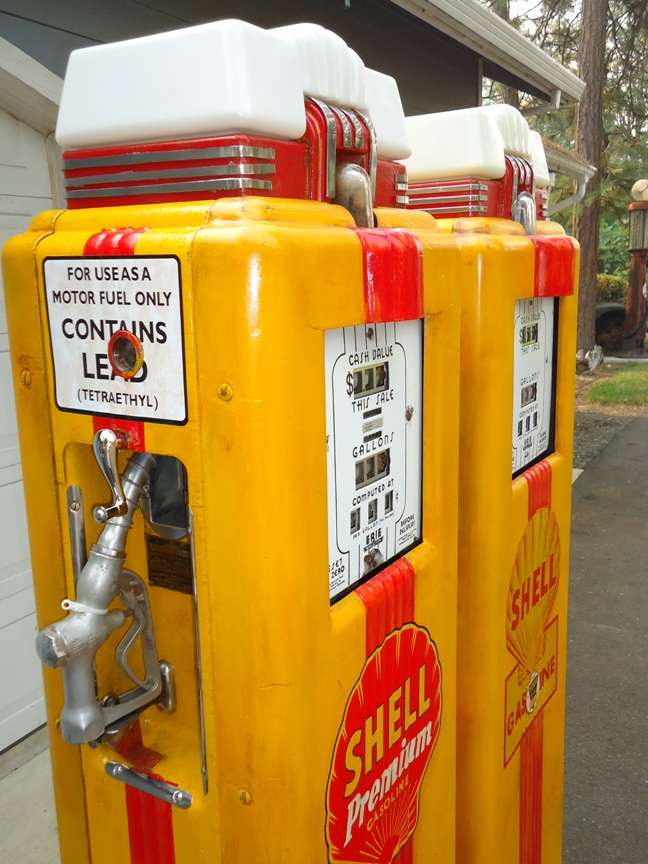
Close :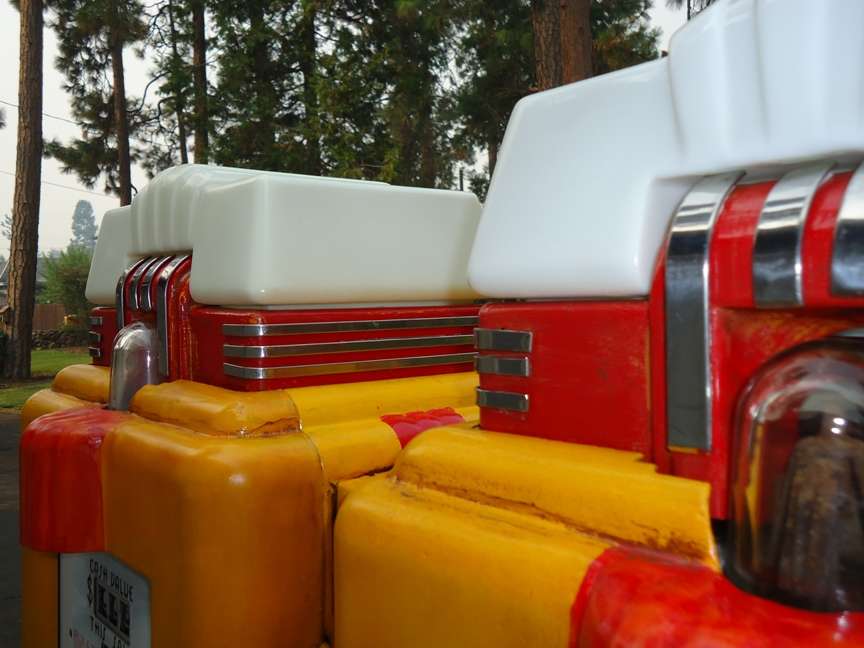 Uploaded with ImageShack.com
I was able to obtain ˝ of a very rare Erie 70 Twin. I wanted to thank Matt Alvarez for his generosity when he sold me his Erie, so I could have the second pump to complete this project.
Over the years, I’ve come to realize that I prefer the look of the old pump with character, rather than the high gloss of new looking pump.
I’ve restored or “rustored” a few pumps now and have figured out a system that works for me. I’ll share with you how I do this process, and hopefully, some of you will share maybe a better way of accomplishing this.
At the end of this I will post a link to a 4 minute video that I did on this pump. I think the pump turned out much better than the video did. More practice I guess.
To start with, let me tell you that I’ve never done this on a freshly sandblasted pump. I have always used a pump that had the old paint, nicks, chips dings etc. I’m not sure exactly how I’d use this process on a very clean pump. Trial and error I guess.
I usually strip off any stainless or other trim piece that will be highlited when the pump is finished.
On the Erie 70 twin, I started peeling/picking off the paint that was over the original shell decals. This is a major time consuming job, as it’s hard to do especially where there have been decals placed over older decals. On this pump, I ended up using the 3rd decal down.
In the past, I’ve tried paint stripper, but I don’t have the patience or timing to remove just the top layer before it softens up the decal. I have also tried a heat gun, and for me, that process just kind of “gummed” everything up, and stuck the paint/decal/more paint together even tighter. No problem with either of those processes if you want to remove it all.
The single edge razor blade is what I use. Sometimes I can slide the blade in between the decal and the paint on top of it. Sometimes, I just have to pick, pick, pick. Like I said, it’s a time consuming process.
On the Erie 70 twin, a lower portion of the decal with missing on both sides, making it look pretty bad. I tried filling it in using a small paint brush and red paint, which made it look worse. I ended up using the small 3” porcelain “ethyl” signs over the damage on both sides.
I lightly sanded the whole pump, making sure that I did not remove all of the chips, dings or scratches. Basically, I just wanted to smooth up the surface a little for better adhesion of the paint. I wanted to leave the recessed dings, as they will give the pump “character” later in the process.
I used an enamel paint (like Rustoleum) and rolled or brushed a coat of yellow paint over both pumps. I used the brush, to make sure all of the brush marks were going the same direction. Make sure that you paint around your decal, now that it’s exposed. Spray paint would work just as well. I couldn’t find the right shade of yellow in spray, so I brushed it on.
After the yellow dried, I used red enamel paint, and painted a light red vertical stripe on the doors, as well as a red base, and red top portion that would hold the globe.
Then, using a rag soaked in paint thinner, I “ragged” over the red stripe, removing enough of the red paint that in areas, one could see the yellow underneath. This gives the red color the illusion that it’s faded with time.
I left a heavy coat of red paint on the base. On the top portion, I had to let it dry, and by the time I got back to it, the thinner didn’t work well, so I used some light sand paper to expose some yellow paint areas underneath the red.
I was able to expose much of one “leaded” decal on one pump, but on the second pump, I had to apply a new leaded decal.
Since one of the pumps I was using had been painted red on one side, and green on the other, and there were not Shell decals to start with, I used two new decals for the doors of the second pump. I chose the red “premium” decal, as I wanted this twin, to look like it dispensed two different grades of gasoline.
I then thinned some brown enamel paint to the consistency of stain. (or you can use a walnut stain) Using a soaked rag, I went over the whole pump including the “leaded” and door decals with this stain. At the same time, I had a clean rag in the other hand, and quickly wiped the stain off, leaving the nicks, and scratches dark, but removing most of the stain from the rest of the surface.
This is not an exact science, as you do this process, you will begin to see the pump age, and you can add more, or remove additional stain to get the look you are going for.
Let this all dry, and polish your stainless, or clean your globes while waiting for it to dry. In my case I needed some new stainless for the strips on top. It seemed everyone was at Iowa gas, so I found an old piece of stainless, cut some new strips, bent them, and attached them with double sided tape.
After the pump is dry, I covered the whole thing with a coat of semi-gloss clear. This will protect the different colors of paint/stain that is on the pump, and also give it a little shine. I do not use a high gloss on this process, as that is not consistent with a pump that was “found in the wild”. On other pumps, I have used a “flat”, or sometimes “matt” clear coat.
After the clear dries, bolt on your stainless, the globes, nozzle etc. and you are done.
I couldn’t find, nor could I afford original milk glass tops for the erie. I had purchased one of the plastic tops made, and so had Matt Alvarez. When I purchased the pump from Matt, it came with his top.
This reminds me, if anyone should have been writing an article on “rustoration”, it should have been Matt. His collection of “found in the wild” pumps is incredible. This isn’t just one guy’s opinion, I’ve heard several other collectors mention his collection.
o Here is a link to the video on the internet. http://www.youtube.com/watch?v=CKKfP7fY3cE&feature=youtu.be
Pump I started with:
Uploaded with ImageShack.comRed green pump:
Uploaded with ImageShack.comPicking decal:
Uploaded with ImageShack.comTwo doors:
Uploaded with ImageShack.comTop:
Uploaded with ImageShack.comLeft:
Uploaded with ImageShack.comClose :
Uploaded with ImageShack.com