
#107694
Wed Mar 22 2006 06:15 PM
|
Joined: Nov 2005
Posts: 8,994
Veteran Member
|

Veteran Member
Joined: Nov 2005
Posts: 8,994 |
ive been watching too!lots of great little tips i didnt kno thanks guys
Looking for gas,oil related clocks,especially neon and spinners .clock repair available. Mick
|
|
|
Please - NO offers to Buy or Sell in this forum category
Statements such as, "I'm thinking about selling this." are considered an offer to sell.
|
|

#107695
Wed Mar 22 2006 07:29 PM
|
Joined: Nov 2004
Posts: 9,346
Veteran Member
|
|
OP
Veteran Member
Joined: Nov 2004
Posts: 9,346 |
Good job so far Thunder. Glad you all you like it so far this is what it for. Picking up good points.
Wanted Owens Motor Oil & Mobiloil Gargoyle. Brad Ralston & my website is www.petrobarn.com
|
|
|
#107696
Fri Mar 24 2006 06:15 PM
|
Joined: Jan 2006
Posts: 3,050
Veteran Member
|
|
Veteran Member
Joined: Jan 2006
Posts: 3,050 |
OK. lets start putting things together. I used new screws to put the skins back on, #10 self threading hex head screws. When the side skins go on, you need to get in there and reconnect the reset mechanism, and hose wind retractor cable. The cable is tricky, so be careful. The easiest way to put it back is to, bolt it in place, wrap the cable around the wheel until it is all wound up, then pull the end out through the hole in the side, then put the retainer clip back in place. Test the cable to be sure that it works right. Carefully put the top in place, and intsatll the six bolts the hold it in. The doors, frames, and other small parts go on, just like you took them off. For my reset handle bezel, I chose to replace it. Mine was rusted. Because I didn't need any other parts to finish my pump, I chose to use a pipe bezel from the hardware store. What I used is one of those stainless steel bezels that go over a pipe, that comes out of the wall, that goes to your sink or toilet. Yes thats cheating, but it works...
Finish up with your decals & signs, then stand back and admire your work. That looks pretty good over there, doesn't it?
Sorry that the feature was short, but I gotta make room for the next R.O.T.M. If there are any questions post them here, and I'll get an answer for you. Thanks for following, now show us what you've learned....
Anything Chevron ![[Linked Image from i17.photobucket.com]](http://i17.photobucket.com/albums/b68/thunder_/136chevronlrg.gif) I'd rather be flying.....
|
|
|

#107697
Tue Mar 28 2006 06:02 PM
|
Joined: Jan 2006
Posts: 3,050
Veteran Member
|
|
Veteran Member
Joined: Jan 2006
Posts: 3,050 |
It looks like I have a few more days here, so lets see what kind of additional damage that we can do!!!! My pump did not have the "Contains Lead" signs, so I chose to add them. If you choose signs, and try to drill the holes to mount them, DO NOT try to measure the holes and drill free hand. Trust me on this, it wont work.... 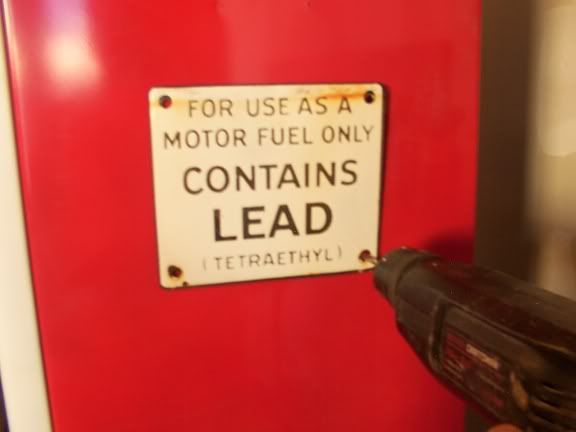 Place the sign on the side skin, double sided tape works good here, put a matching sized drill bit through the holes in the sign, and drill them while using the sign as a guide. That's called match drilling. It's the safest way to do something like this. Let's take a look at the reset bezel that I used..... Time for a cheat code here.... 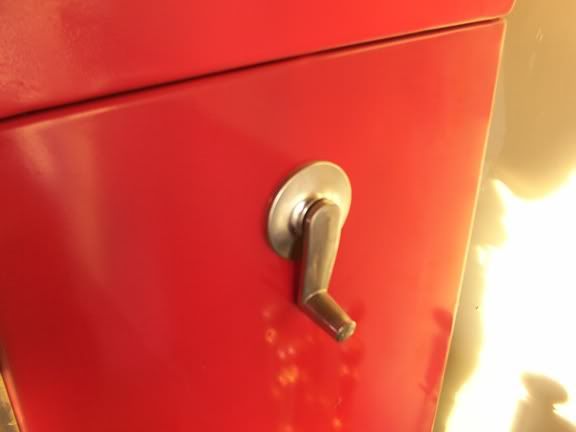 I used an ordinary plumbing bezel here. If I needed any parts, I would have ordered one from my supplier. The fact is, this only costs about a dollar, and I was at the store anyways..... Frist, I made a template. It had a hole the same size as the reset handle. The two other holes are for the fasteners. 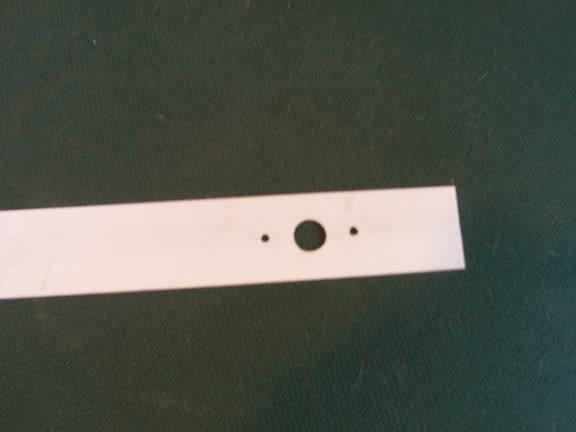 I spaced two holes in the template, and installed two 10/32 bolts. I put JB Weld on the bolt heads, then put the template into the back side of the bezel, which already had the handle installed. I used the five minute stuff here. When the JB Weld dried, the bolts were attached to the bezel. I used the template to match drill the two mounting bolt holes, by matching the main hole in the middle. I redrilled the two holes with the next larger bit, to give a little bit of fudge factor, then installed the bezel, with two 10/32 nuts. That should hold the bezel in place when you crank the handle.....
Anything Chevron I'd rather be flying.....
|
|
|
#107698
Mon Apr 03 2006 08:30 PM
|
Joined: Jan 2006
Posts: 3,050
Veteran Member
|
|
Veteran Member
Joined: Jan 2006
Posts: 3,050 |
So at this point, I think decals will finish it. Decals can either be applied directly to the pump, or on a piece of metal or a magnet. By putting it on a piece of metal, they can be installed like ordinary signs. By putting it on a magnet, they can be removed and changed at will. Putting screw heads on the decal here will add to the sign look. Lets start with the water transfer decal. Get your door skin and lay it down flat. If your decal is to be set in a particular place, it can be marked with masking tape. Be sure to outline the dimensions a bit larger than the decal, so that the decal does not lay across the tape layout. Be sure that the door is clean and free of dirt and dust. Get a pan thats larger than your decal. Put about an inch of warm water in the pan, and drop the decal in the water. It will probably curl up here, thats ok, just unroll it to get it down into the water. In about a minute, the glue will loosen and the decal will slide on the backing paper. Pick up the decal & backing paper, and position it on the panel. Slide the decal off the paper just a bit. Hold the decal in position and slide the paper out from underneath. It should slide off easy, if it doesn't, the glue isn't ready yet. When you get the paper out, you can adjust the position of the decal. Dont dry it yet, the water lets the decal slide around, and this will allow you to position the decal where you want it. When you are satisfied, dab the decal with a soft towel or tissue paper. Be careful not to rub as this might damage the decal. Leave the panel flat overnight to dry. If you pick it up, the decal might slide out of position. Walk away from it and dont look back. As it dries, the decal is likley to wrinkle a bit, but as it dries, it should flatten out. Vinyl.... This starts out the same, clean, flat, layout.... Get a squirt bottle, with some water and a few drops of soap. This will allow you to adjust the decal. Spray the panel with a generous amount of the soap/water mix, and keep it wet. This decal also has backing paper, but this one is peeled off. Some times the paper can be removed by folding a corner, causing the backing to slide a bit on the corner, then you can pull them apart. Another method is to put tape on the decal, and the backing paper, and pulling them apart that way. Whichever method that you use, be sure that you dont allow the decal to fall against itself, if it does, you wont be able to save it. Some decals have the backing paper split in the middle, if this is the case, you only need to remove one piece, set the decal, then pull the other piece off as you roll it from under the decal. The soap/water mix, will allow you to slide the decal a bit for final adjustment. When you are satisfied, a credit card will make a nice squeegee to work the water out. Start in the middle, and work out to the edges, while holding the decal in place. If you have a bubble that you cant work out, a pin hole in the bubble will usually do the trick. Again, let it set overnight. These are vinyl decals, about 2x10 feet....  Now put it all together, set it up in your game room or garage, plug it in, turn it on, and enjoy your creation..... 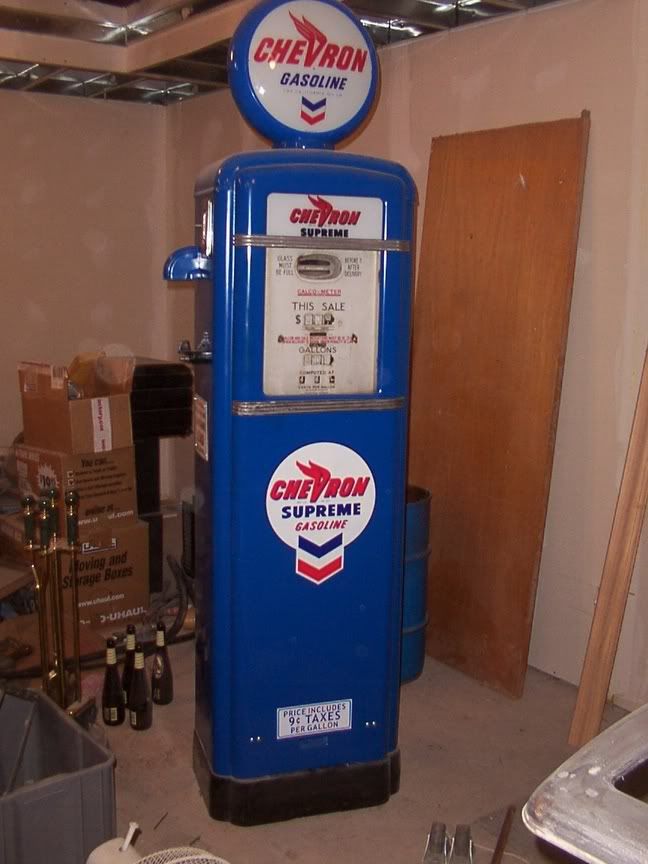 Thanks for following along. I know that there are better ways to do most of these procedures, but this feature was geared towards somebody without a full restoration shop. Do you get a "Museum Quality" pump this way? Well, no...... But you did it yourself..... And look at all the money that you saved. Thats enough for another pump isnt it? I hope that we'll be seeing your pump here soon..... Thank again.
Anything Chevron I'd rather be flying.....
|
|
|
#107699
Tue Apr 04 2006 12:52 PM
|
Joined: Dec 2005
Posts: 23
Member
|
|
Member
Joined: Dec 2005
Posts: 23 |
Great job Thunder! Always interesting to get some new ideas! Thanks very much!
|
|
|
#107700
Tue Apr 04 2006 01:33 PM
|
Joined: Oct 2000
Posts: 22,780 Likes: 5
Veteran Member
|
|
Veteran Member
Joined: Oct 2000
Posts: 22,780 Likes: 5 |
Jeff,
How did you get that ROLL-OFF to lay flat on it's SIDE for the decal ? LOL
GREAT JOB.
db
------------------
**PUT A LID ON IT**
1qt RE-LIDDING
|
|
|
#107701
Tue Apr 04 2006 03:34 PM
|
Joined: Jan 2006
Posts: 3,050
Veteran Member
|
|
Veteran Member
Joined: Jan 2006
Posts: 3,050 |
Somehow..... I knew that I should have expected that......
Getting it to lay on its side is easy. Its the decals on the BACK, that are a bit harder to work with.....
Anything Chevron I'd rather be flying.....
|
|
|
#107702
Wed Apr 05 2006 04:01 PM
|
Joined: Nov 2004
Posts: 9,346
Veteran Member
|
|
OP
Veteran Member
Joined: Nov 2004
Posts: 9,346 |
Great job Thunder. Thanks alot for doing this. If anyone wants to do a ROTM drop me a line. There is alot of info out there that could help someone else out. Lets share it & help out Old Gas. This is what is for. I will post Aprils on the 10th.
Wanted Owens Motor Oil & Mobiloil Gargoyle. Brad Ralston & my website is www.petrobarn.com
|
|
|
#107703
Fri May 12 2006 04:40 PM
|
Joined: Nov 2005
Posts: 8,994
Veteran Member
|
|
Veteran Member
Joined: Nov 2005
Posts: 8,994 |
bringin up to the top for doug!here ya go buddy
Looking for gas,oil related clocks,especially neon and spinners .clock repair available. Mick
|
|
|

#107704
Sun Jul 01 2007 09:15 AM
|
Joined: Jun 2006
Posts: 61
Active Member
|
|
Active Member
Joined: Jun 2006
Posts: 61 |
Bump! An excellent article Thunder, thankyou.
|
|
|
#107705
Wed Jun 04 2008 07:51 PM
|
Joined: May 2008
Posts: 4
Member
|
|
Member
Joined: May 2008
Posts: 4 |
I must admit - I really enjoyed this!
I will read it several more times and commit as much as possible to memory (and save to Zotero in Firefox, too).
If you ever get in the mood to publish a few more articles like this - I'm Ready and Waiting.
|
|
|

#107706
Wed Jun 04 2008 08:08 PM
|
Joined: Jan 2006
Posts: 3,050
Veteran Member
|
|
Veteran Member
Joined: Jan 2006
Posts: 3,050 |
Thanks Mr Oldewrench, and welcome to the best darn petro site on the web. I'm self employed, and have been super busy lately, not that I'm complaining, but I havent had much time to spend on my petro stuff lately. I've got a restoration project in mind though. I'll be sure to keep everybody posted. Thanks again. Let us know when you start your project.
Anything Chevron I'd rather be flying.....
|
|
|
|
|


